custom printing services for Spot UV Corporate Folders

Print Spot UV Corporate Folders

Spot UV Corporate Folders are one of the most versatile marketing tools for any business. They are a quick and inexpensive way to share your contact details with business partners or new potential clients and play an important role in creating a lasting first impression.

Select one of the options below to get started

Upload Your Design

Click here to select your product options and to upload your print-ready artwork.

Let Us Design Or Adjust Your Artwork

Click here if you want us to design or you need help to create a ready-to-print file (e.g. editing of formatting).

Browse Our Templates

Select this option to browse our templates and create your artwork online

STEP 1Choose Your Options
Need help configuring your product or preparing your artwork?
10400, BANGKOK
Spot UV Corporate Folders
Format
Choose Format
Infos & TipsDiscover our two format options for our corporate folders to suit different presentation styles: the Single Round Pocket, which features a smooth, curved design for a clean and modern look, and the Single Angular Pocket, which has sharp lines for a more structured and professional appearance. Both formats are ideal for securely holding documents, brochures, or business cards and can be fully customized to reflect your brand identity, using high-quality materials for a polished finish.
Experience our Corporate Folders are designed to securely hold a specific number of sheets, keeping your documents organized and safe.
How to choose the perfect fit?If you have a design, verify its dimensions using Adobe Acrobat's 'Check Document Property' function; discover more details here. Don't have a design yet? Utilize our templates tailored for the specified sizes.
Side Of Print
Choose Side Of Print
Infos & Tips
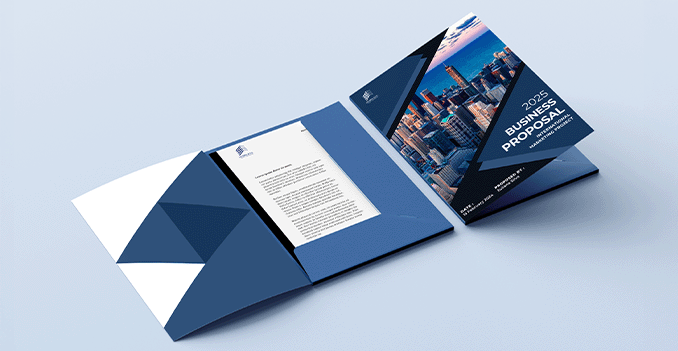
We offer full color printing for inside and outside and outside only for your corporate folders.
Looking for a premium paper option for your corporate folder?Experience the premium quality of our Art Card Glossy paper material, specially selected for corporate folders. This smooth, high-shine finish enhances the look and feel of your branding, giving your folders a professional and impactful appearance. We offer multiple weight options ranging from 260gsm to 350gsm, allowing you to choose the thickness that best suits your needs—whether you prefer a lighter, flexible feel or a sturdier, more substantial presentation.
Paper Type
Choose Paper Type
Infos & Tips
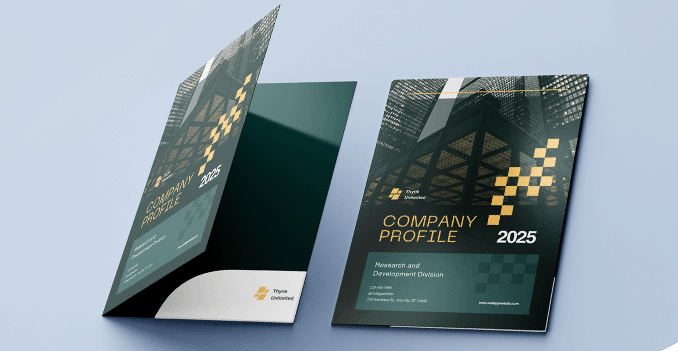
Explore our diverse range of corporate folders materials, each uniquely tailored to cater to your specific needs and preferences.
Which material should I choose?Discover our 260g Art Card, perfect for a smooth, professional finish, and our 310g Art Card, offering a balance of thickness and elegance for premium projects. For a robust and luxurious feel, our 350g Art Card provides exceptional durability and impact. Whatever your project demands, find the perfect material to make your creations stand out effortlessly.
Finishing
Choose Finishing
Infos & TipsExplore our range of lamination options, designed to add a touch of refinement to your prints.
How can you add a touch of luxury to your corporate folder?
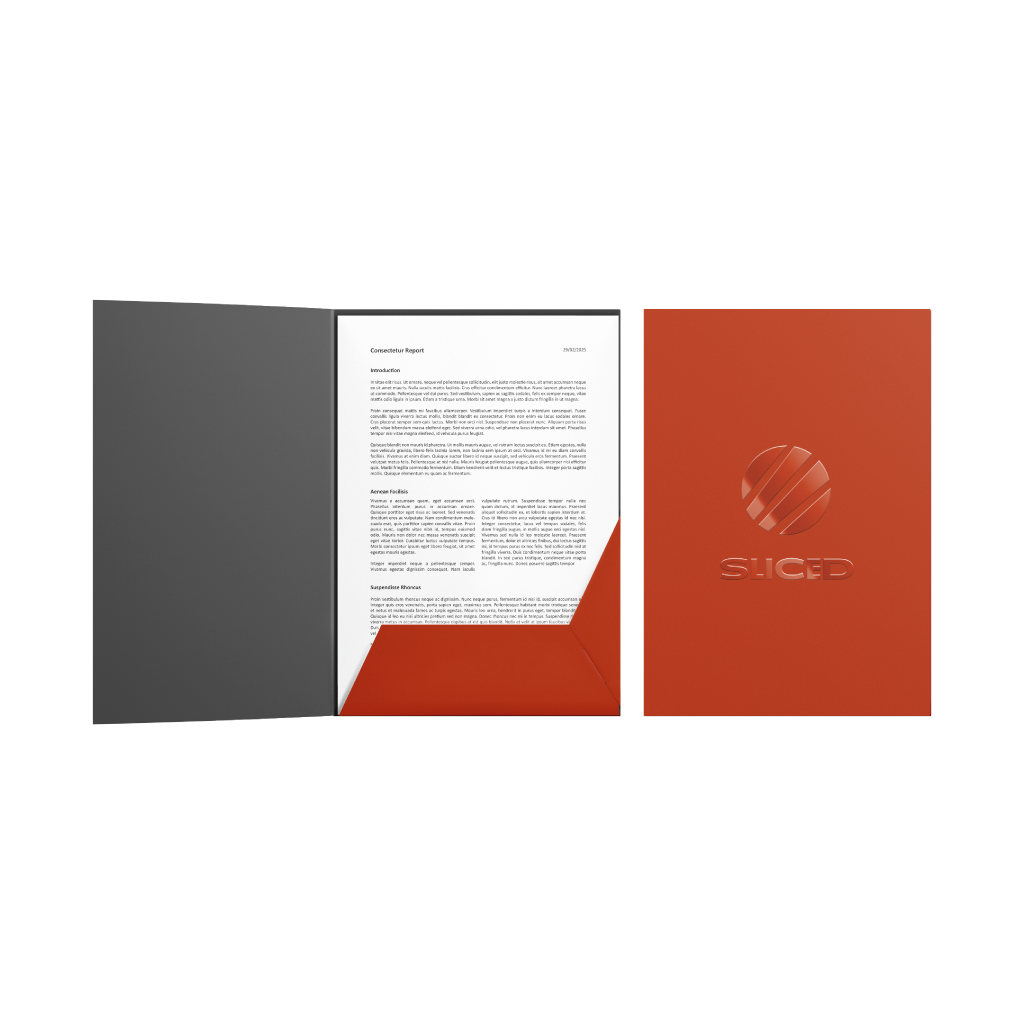
Experience our corporate folders feature a high-end finishing option of Matte Lamination with Spot UV on the outside only, combining elegance with visual impact. The matte lamination provides a smooth, refined texture, while the Spot UV adds a glossy, raised effect to selected areas—perfect for highlighting your logo or key design elements. This finishing touch not only enhances the overall look but also adds durability to the folder, making it ideal for a polished and professional presentation.
STEP 2

Choose a Quantity & Delivery Date

Please select the price below to see the cutoff time.
Quantities
Receive your products by
500 pcs
1,000 pcs
2,000 pcs
3,000 pcs
5,000 pcs
10,000 pcs
Fri, 23 May
Fastest
Can't find the quantity you're looking for? You can add a custom quantity you want
Set Custom Quantity

Product's quantity must be more than 500 pcs and less than 100,000 pcs. In the multiples of 1

Details about ordering Spot UV Presentation Folders

  • Please note, that the website price is only valid for our standard template. If you have custom requirements, please contact our customer service for a quote.
  • Please note, that without any lamination for your presentation folders, you risk seeing small visible cracks on the folding line, especially with dark colors
Information
Artwork Preparation

  • 1. Add 3 mm of bleed

    During the production of paper products, cutting imperfections are to be expected - cutting can be off by a couple of millimeters from the cutting line. To allow leeway for such imperfections, you should add 3 mm of bleed on all edges of your artwork. Make sure that all colors, background pictures, and elements extend to the edge of the bleed area, to avoid the appearance of while borders on certain edges after cutting. Learn more how to set up the bleed here.

  • 2. Keep your content within a 3 mm safety margin

    To ensure that no important elements (text, graphics, images) get cut off from your paper product, make sure to keep such elements at least 3 mm away from the edge of your finished product dimensions.Click here to know how to set up 3 mm safety margin.

  • 3. Use CMYK color mode

    Except for silkscreen and pad printing, files should be prepared in CMYK color mode. Keep in mind that if the setup is wrong, colors on the finished product may differ from the file you sent. Here is how to set your artwork to CMYK color mode in Adobe Illustrator.

  • 4. Use an image resolution of at least 300 DPI

    To avoid blurriness, use only images and graphics that have a resolution of 300 DPI or more. Before sending your files, make sure to embed your images into the file. Read more about how to check the resolution of your assets.

  • 5. Use the right values for gray elements

    When setting up grey elements, set K to a percentage between 0 and 100, and keep all other colors (C, M, and Y) equal to 0%.

  • 6. Use the right values for black elements

    When setting up black text, thin lines and small elements, use pure black, i.e. C = 0, M = 0, Y = 0, K = 100). Text, thin lines, and small elements in pure black color should be set to overprint to avoid white gaps around the text. For larger elements, use a composite form of black (we recommend C = 30, M = 0, Y = 0, K = 100).

  • 7. Use maximum 2 colors for lines that are finer than 2 pt

    If lines are 2 pt thick or less, use only 1 or 2 colors. 4 colors may be used for thicker lines.

  • 8. Convert all fonts to outlines, or embed them in your file

    To avoid issues with fonts when submitting your file(s), make sure to convert fonts to outlines, or to embed all fonts when saving to PDF.

  • 9. Save and upload your artwork files as PDF/X-1a

    The best format for submitting print-ready files is PDF, under the PDF/X-1a standard. Where possible, submit your files in PDF format. See why PDF/X-1a is the right format for printing.

  • 10. Keep a safety margin of 5 mm around folding lines

    For products with a fold, keep a safety margin of 5 mm on either side of the folding line, to ensure that your content is safe.

  • 11. Check for overprint

    Make sure that no elements are set on overprint, unless you need them to be.

  • 12. Include a die-cut layer

    For products that include die-cutting, include a die cut layer in the artwork file.

Templates

FAQ

  • 1.

  • 2. Which production techniques are used?

    We only use digital printing technique for this Business cards.

  • 3. How will my n be delivered?

    All of our products are delivered in a securely packed cardboard box.

  • 4. I can't find what I'm looking for. Can I request a quote?

    If you can't find what you need, please call our customer service team at 02-026-3147 to help you place an order. You can also request a quote from our customer service team for special product configurations that are not available on our website.

  • 5. How can I upload my files?

    You can either upload a single file which contains all pages, or upload separate files each containing one page. Your file(s) can be uploaded either before you checkout and pay, or after. Please note that uploading files late might result in a moved expected delivery date.

  • 6. Which formats can I upload?

    The best format for submitting print-ready files is PDF, under the PDF/X-1a standard. Learn how to save your artwork using PDF/X-1a standard in Adobe Illustrator. However you can also upload your file in JPEG, PNG, PSD, EPS, TIFF or AI format for an additional fee of THB 50.00. Our graphic designers will then convert your file into a print-ready PDF file.

Guides and Tools

Everything you need to know to get your Artwork ready

  • 1. Add 3 mm of bleed

    During the production of paper products, cutting imperfections are to be expected - cutting can be off by a couple of millimeters from the cutting line. To allow leeway for such imperfections, you should add 3 mm of bleed on all edges of your artwork. Make sure that all colors, background pictures, and elements extend to the edge of the bleed area, to avoid the appearance of while borders on certain edges after cutting. Learn more how to set up the bleed here.

  • 2. Keep your content within a 3 mm safety margin

    To ensure that no important elements (text, graphics, images) get cut off from your paper product, make sure to keep such elements at least 3 mm away from the edge of your finished product dimensions.Click here to know how to set up 3 mm safety margin.

  • 3. Use CMYK color mode

    Except for silkscreen and pad printing, files should be prepared in CMYK color mode. Keep in mind that if the setup is wrong, colors on the finished product may differ from the file you sent. Here is how to set your artwork to CMYK color mode in Adobe Illustrator.

  • 4. Use an image resolution of at least 300 DPI

    To avoid blurriness, use only images and graphics that have a resolution of 300 DPI or more. Before sending your files, make sure to embed your images into the file. Read more about how to check the resolution of your assets.

  • 5. Use the right values for gray elements

    When setting up grey elements, set K to a percentage between 0 and 100, and keep all other colors (C, M, and Y) equal to 0%.

  • 6. Use the right values for black elements

    When setting up black text, thin lines and small elements, use pure black, i.e. C = 0, M = 0, Y = 0, K = 100). Text, thin lines, and small elements in pure black color should be set to overprint to avoid white gaps around the text. For larger elements, use a composite form of black (we recommend C = 30, M = 0, Y = 0, K = 100).

  • 7. Use maximum 2 colors for lines that are finer than 2 pt

    If lines are 2 pt thick or less, use only 1 or 2 colors. 4 colors may be used for thicker lines.

  • 8. Convert all fonts to outlines, or embed them in your file

    To avoid issues with fonts when submitting your file(s), make sure to convert fonts to outlines, or to embed all fonts when saving to PDF.

  • 9. Save and upload your artwork files as PDF/X-1a

    The best format for submitting print-ready files is PDF, under the PDF/X-1a standard. Where possible, submit your files in PDF format. See why PDF/X-1a is the right format for printing.

  • 10. Keep a safety margin of 5 mm around folding lines

    For products with a fold, keep a safety margin of 5 mm on either side of the folding line, to ensure that your content is safe.

  • 11. Check for overprint

    Make sure that no elements are set on overprint, unless you need them to be.

  • 12. Include a die-cut layer

    For products that include die-cutting, include a die cut layer in the artwork file.

  • 1.

  • 2. Which production techniques are used?

    We only use digital printing technique for this Business cards.

  • 3. How will my n be delivered?

    All of our products are delivered in a securely packed cardboard box.

  • 4. I can't find what I'm looking for. Can I request a quote?

    If you can't find what you need, please call our customer service team at 02-026-3147 to help you place an order. You can also request a quote from our customer service team for special product configurations that are not available on our website.

  • 5. How can I upload my files?

    You can either upload a single file which contains all pages, or upload separate files each containing one page. Your file(s) can be uploaded either before you checkout and pay, or after. Please note that uploading files late might result in a moved expected delivery date.

  • 6. Which formats can I upload?

    The best format for submitting print-ready files is PDF, under the PDF/X-1a standard. Learn how to save your artwork using PDF/X-1a standard in Adobe Illustrator. However you can also upload your file in JPEG, PNG, PSD, EPS, TIFF or AI format for an additional fee of THB 50.00. Our graphic designers will then convert your file into a print-ready PDF file.